The allocation tool will only list and allocate students who don't already have a mark entered in the Gradebook for their latest attempt.
The UWE Allocation tool can be found in the Books & Tools menu. There are three different ways to allocate marking:
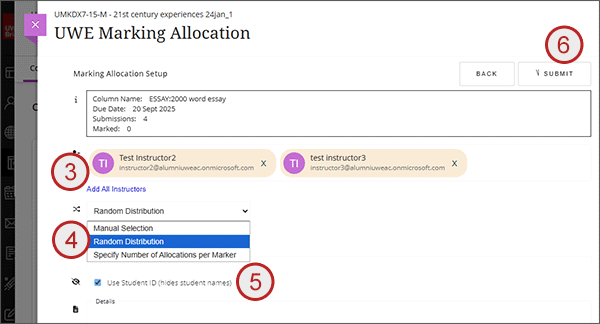
Allocate randomly across markers
Allocates the number of unmarked submissions across the selected markers as equally as possible.
- Use the filters to find the assignment. Those which have closed for student submissions but not already been allocated will display under Ready to Mark
- Click on Ready to Mark.
- Either select Add all Instructors, or in the instructors field start typing a markers name and then select them from the list. If there are markers added that you do not want included, use the X to remove them.
- From the drop down select Random Distribution.
- By default Use Student ID will be ticked. If you want to see student names instead, de-select the tick box.
- Select Submit.
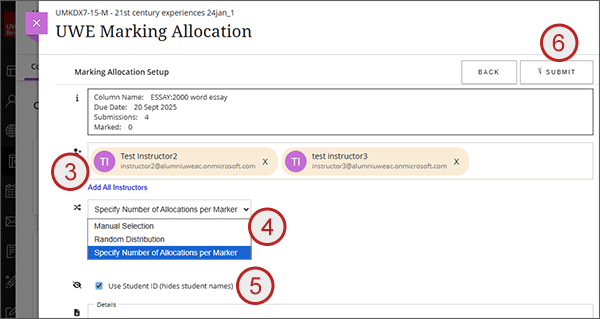
Allocate a specific number of students to specific markers
Allocates the number of submissions set to the selected markers. A short recorded demo is available.
- Use the filters to find the assignment. Those which have closed for student submissions but not already been allocated will display under Ready to Mark
- Click on Ready to Mark.
- Either select Add all Instructors, or in the instructors field start typing a markers name and then select them from the list. If there are markers added that you do not want included, use the X to remove them.
- From the drop down select Specify number of allocations per marker.
- By default Use Student ID will be ticked. If you want to see student names instead, de-select the tick box.
- Select Submit.
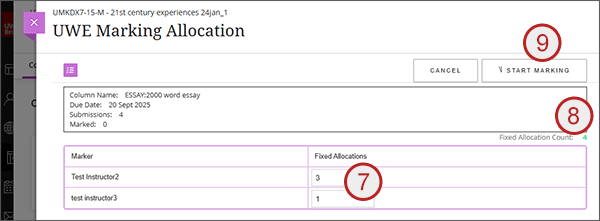
- Enter a number against each of the markers. If any markers are left set to auto it will automatically split the remainder between those markers as equally as possible.
- The Fixed Allocation Count will show a running total of how many you have entered. When it reaches the number of unmarked submissions, it will turn green.
- Select Start Marking.
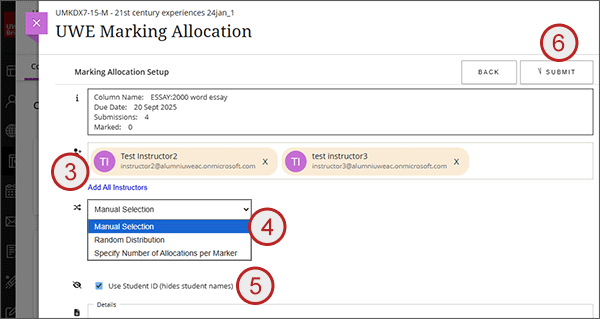
Allocate specific students to specific markers
Allocates the student to the selected marker. A short recorded demo is available.
- Use the filters to find the assignment. Those which have closed for student submissions but not already been allocated will display under Ready to Mark
- Click on Ready to Mark.
- Either select Add all Instructors, or in the instructors field start typing a markers name and then select them from the list. If there are markers added that you do not want included, use the X to remove them.
- From the drop down select Manual Selection.
- By default Use Student ID will be ticked. If you want to see student names instead, de-select the tick box.
- Select Submit.
- Allocate a marker to each student using the Select Marker drop down against each student.
- Use the filter to view just those students who are unallocated.
- Use the Select Marker filter to see existing allocations for a marker.
- Please do not set up Second Marking at this stage.
- When happy with the allocation set up, select Start Marking.