If you prefer to record your marks using a spreadsheet rather than entering directly into the Gradebook, this can be done using the Download Gradebook function. The ‘Download’ option will provide a spreadsheet for you to enter your marks and the ‘Upload’ option allows you to upload that spreadsheet of marks back into Blackboard.
You need to have created the Gradebook column before downloading the spreadsheet.
Downloading a spreadsheet
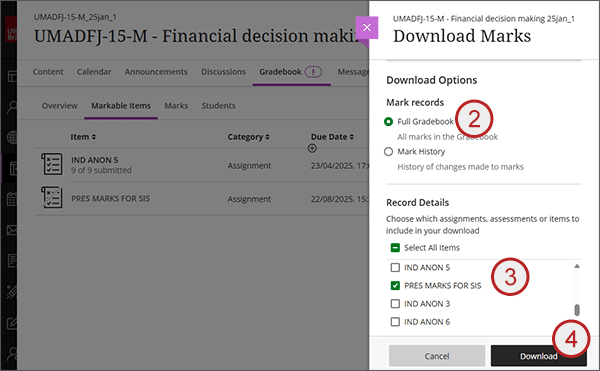
- From any tab in the Gradebook (excluding Overview) select the Download icon.
- Leave Full Gradebook selected.
- Under the Record Details section, select the specific column that you created manually.
- Select Download.
- The file will be downloaded to your computer.


Editing and saving the spreadsheet
Please only add marks for students who did make an attempt. Do not enter a mark of zero for any non-submitting students as this will be interpreted as an attempt rather than a non-submission. Non-submissions should be left blank.
- Open the file that you downloaded and you will receive an Excel prompt to say that the file is in a different format to that specified by the file extension. Select Yes to open.
- The spreadsheet will have the columns for Last Name, First Name, Username, Student ID, Last Access, Availability and finally the gradebook column you created and selected to be included.
- It is important not to change the formatting of the spreadsheet but you can sort the column data into the order that you want to mark them in, for example by Student ID.
- Enter your marks in the column for your manually created gradebook column.
- If you add additional columns for your own data, please remember to delete them from the spreadsheet before uploading the marks.
- Save the spreadsheet either as the same format of XLS or CSV.
Copying from another spreadsheet
If you wish to copy marks from a different spreadsheet into the downloaded spreadsheet, we would recommend you make at least the following checks:
- Order both spreadsheets in the same way before you copy
- Check that the number of student rows match in both spreadsheets
Once the two checks above are carried out, the following more advanced check can be made to compare that the students are in the same order and the same rows:
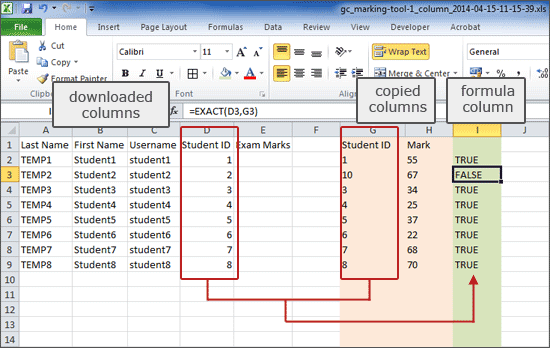
- From your other spreadsheet, copy the equivalent student ID and marks columns.
- Paste these columns into free columns in the downloaded spreadsheet.
If the data you copied is calculated, please use the Paste: Values option
 . This will ensure that only the end value is pasted and not the formula.
 - In the next available column enter the formula =EXACT(D2,G2) (Assuming that column D is the Student ID column from the downloaded spreadsheet and column G is the Student ID column copied from your other spreadsheet - adjust as required).
- Use the Fill down function to apply the formula to all rows.
- Where the content of the two columns match you will see TRUE. Where the content of the two columns does not match you will see FALSE.
- Once you are happy that the students are in the same order and the same rows, move the copied marks into the column for your manually created grade column.
- Delete the two columns that you copied in from the other spreadsheet and also the column containing the formula.
- Save the spreadsheet. Select Yes on the Excel prompt saying that the file may contain features that are not compatible with Unicode Text.

Uploading the spreadsheet
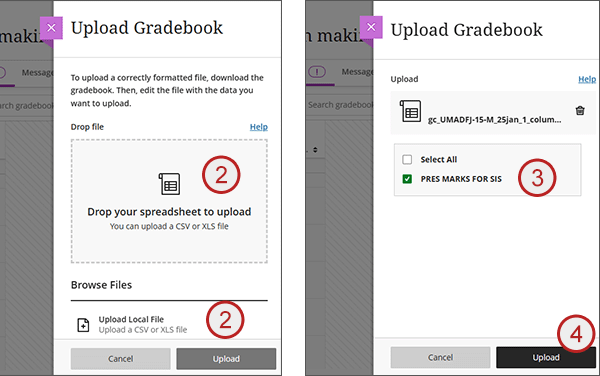
- From any tab in the Gradebook (excluding Overview) select the Upload icon.
- Either drag and drop your saved spreadsheet or use the Upload Local File option.
- Once uploaded you will see what columns Blackboard is recognising in the Spreadsheet. Just tick the column that contains your edits i.e. the manually created gradebook column where you've entered the marks.
- Select Upload.
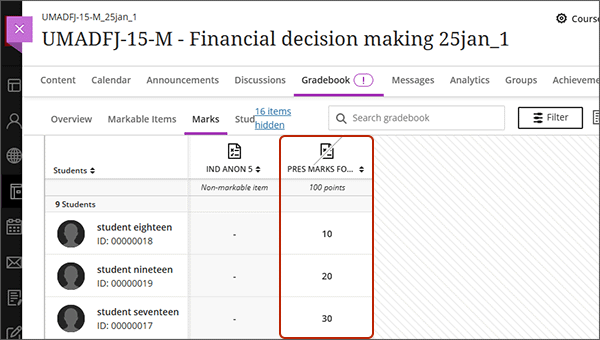
- The marks should successfully upload into the Gradebook column. You may need to refresh your browser screen.
- The next step is to carry out the Grade Mapping process and send your marks to the Student record system.


