For students who have been asked to create or upload a video file using Kaltura Media, you first need to access Kaltura Media and upload or create your media file in your My Media area. Once you have completed this, you make your actual assignment submission following the quick steps below.
Important note 1: It is essential that you allow ample time before the submission deadline to upload your media file to Kaltura (we recommend that you allow at least two hours before the submission deadline). Depending on the size of the file, Kaltura will take some time to convert the file before it is available to attach to your assignment submission through Blackboard.
Important note 2: To avoid upload problems, it is recommended that you upload very large media files over a wired internet connection rather than wifi.
Important note 3: Uploading or creating a file in your My Media area does not constitute a submission and instructors will not be able to access your file. You need to complete the assignment submission process following the steps below.
QUICK STEPS: submitting a Kaltura My Media file to an assignment
- Enter the Assignments area of your course.
- Click on the assignment’s title.
- Review the Instructions and any files attached by the instructor.
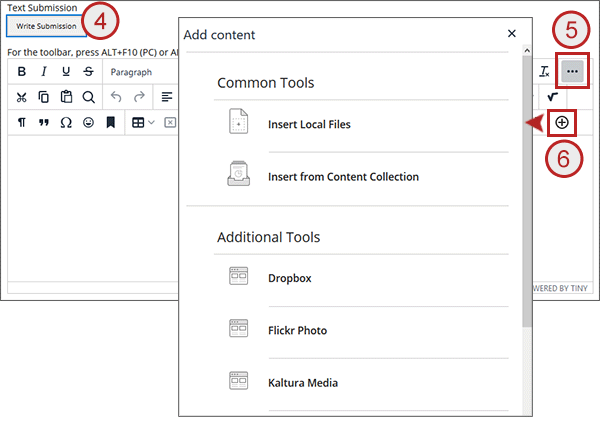
- Click on the Write Submission button and the text editor will display.
- To show all the rows of the editor’s functions click on the Show More icon in the top right.
- Expand the Add Content tool (black plus icon) and select Kaltura Media from the list.
- You will see the contents of your My Media area. Click the Select button for the file that you want to attach to your submission.
- Note: To see media which has been shared with you via the collaborate option you may need to click the filters button and tick media I can publish.
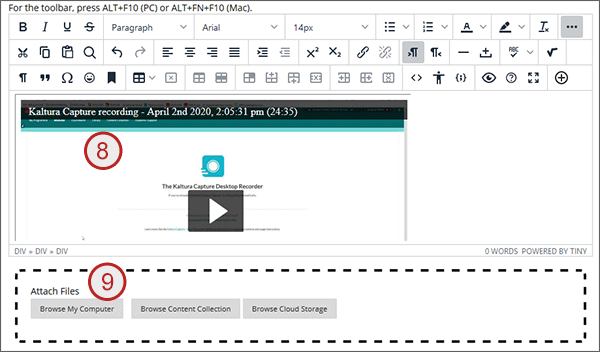
- You will now see a thumbnail of your media file inside a table in the text editor. If you need to attach any other Kaltura Media files, we recommend you click to the right of the table which contains the first media file before repeating steps 6 and 7 again.
- If you need to attach any other files to your submission use the Browse My Computer button to find and select them.
- When you have attached all the files you are required to, select Submit.


Important: We strongly recommend that you check your submission has been uploaded successfully by following the guidance on the Checking your submission was successful page.
