Private / assessment meetings are meetings for specific invited users. This type of meeting would be used for events such as online recorded student assessments or personal performance meetings etc.
Any staff or student invited to the meeting will be able to join without going into the lobby and will have full presenter access in the meeting, meaning they can share screen, use apps and record etc.
IMPORTANT: By default private / assessment meetings are set to migrate to Panopto automatically. This process includes the removal of shares to the original recording in OneDrive which ensures that students cannot access the meeting recording after it has happened. If you change the meetings migration settings, the removal of the shared access may not happen - we strongly recommend to leave the migration setting to 'Private Online folder'. Please also note that if the meeting recording ends over 2 hours after the meeting end time set, the migration to Panopto and the removal of the shared access will not happen automatically.
If a meeting has a migration folder set, you will see a black camera icon to the left of the meeting join link.
Private / assessment meeting recorded demo
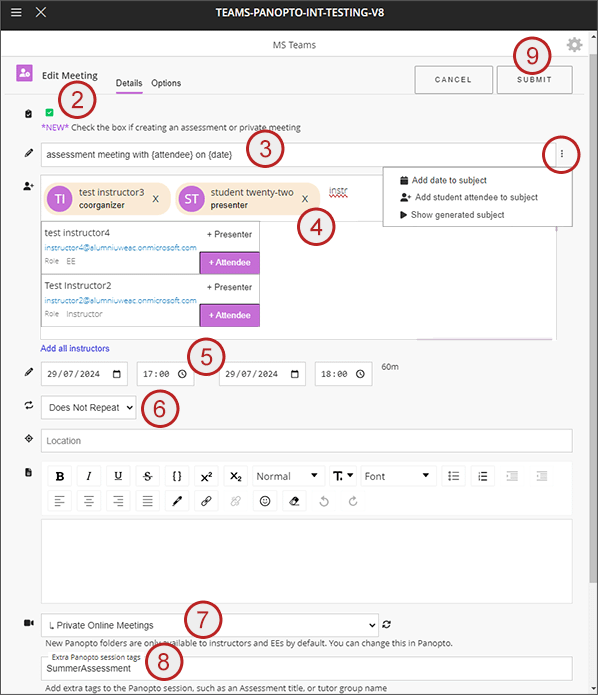
- Select New Meeting.
- Tick the check box for assessment / private meeting.
- Enter a name for the meeting. Optionally use the ellipses to add the meeting date or the invited student name to the name of the meeting (note that only 1 student name will be added).
- Start typing the names of the users you want to attend - as you start typing, a list of the people on the module that match will be displayed. Against the appropriate user select Presenter. The user will be added to the box. Repeat until all the required people have been added. Optionally use the Add all instructors link to add all the members of staff attached to the module run.
- Set the start date and time. Set the end date and time. Make sure the start and end dates/times are correct.
- Optionally set a repeat option.
- By default, private or assessment meetings will be set to migrated to Panopto to the folder called 'Private Online Meetings' - students do not have access to this folder. We strongly advise NOT to change this setting.
- Optionally, add tags for use in Panopto adding a space between tags. By default, a #TeamsMeeting and the invited students number will be added as tags to the recording in Panopto.
- Select Submit.
- You get an on screen processing box showing the various settings being made. When complete select the Back button to return to the main meetings list.
- The following processes will happen automatically:
- The meeting will display in the main meetings list in Blackboard for the creator and anyone who was invited
- Anyone invited will receive an email invite. The creator does not receive an email.
- Anyone invited will be able to see the meeting in their Outlook and Teams calendars.
- When the meeting is ended, if a recording was made:
- The recording link will be removed from the meeting chat.
- The recording in OneDrive will have the shares for any attendees removed. Only the creator will be able to access the recording from OneDrive.
- The recording link in the meeting recap will only be accessible by the creator of the meeting.
- A copy of the recording will be migrated to the course folder in Panopto within a folder called 'Private Online Meetings'. Only staff have access to this folder.

