For exams that are to be submitted online, our recommendation is for Module Leaders to ensure that the work item is set up as Grade Column Mapping in ISIS and then they need to manually create an assignment submission point in Blackboard with the relevant date and time restrictions.
Important note: Manually created assignments have no connection with ISIS and so when you release marks to students, the marks will not automatically be extracted to ISIS. If there is a corresponding work item in ISIS for this assessment set up as Grade Column Mapping, after you've released the marks, you will need to use the Grade Column Mapping tool to send the marks to ISIS.
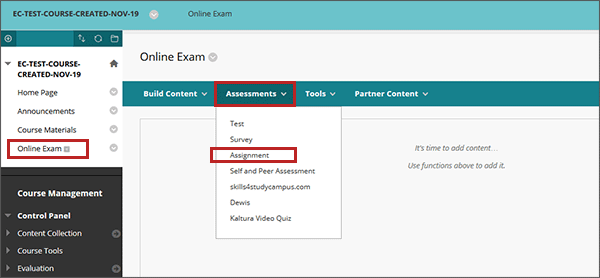
- Decide where in your assessment will be located in the course – which content area from the left hand course menu. This can be in an existing area or you can create a new content area.
- Once in the content area click on the Assessments option and from the drop down select Assignment.
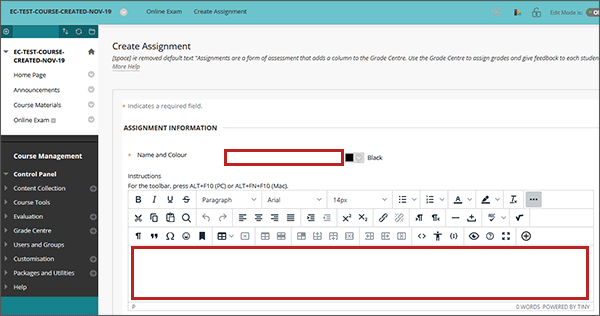
- Give the Submission Point a name and enter the required instructions to students.
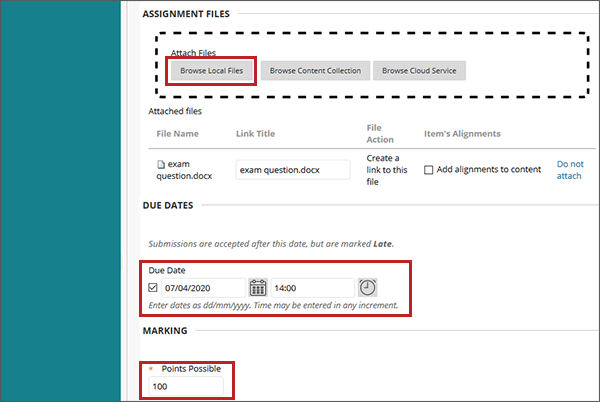
- Attach the exam / submission question using Browse Local Files and selecting the appropriate file.
- Set the due date and time – this is the date and time that students must submit by. This should be the same as the Display Until date and time further down the screen.
- Set the Points Possible to 100.
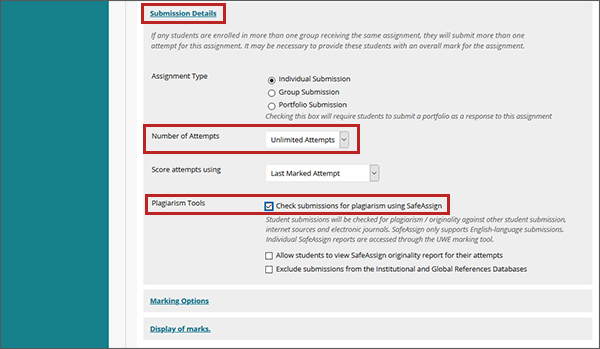
Please note that for the grade mapping to work correctly, the points possible must match what is set for the work item in ISIS - this is usually 100. - Click on the Submission Details link and change the following:
- Number of Attempts – change to unlimited attempts.
- Plagiarism Tools – tick the Check submissions for plagiarism using SafeAssign option.
- Please do not change any settings in the Marking Options area. These functions are standard Blackboard tools for when marking in the grade centre but they don't necessarily fit the UWE marking processes. If you use the UWE marking tools to mark your manually created assignment, when you first set up the marking you will be given the choice of whether or not you mark anonymously.
- Expand Display of Marks, and set Include in Grade Centre marking calculations to be NO and Show to students in My Marks to be NO.
This is so students cannot see marks entered during the marking - when all the marking is complete, you will need to make the marks visible to students. - Ensure that the Make the Assignment Available option is ticked.
- Set the Display after date and time – this is the date and time that the submission point should first become accessible to students.
- Set the Display until date and time – this is the date and time that the submission point should stop being accessible to students. This should be the same as your due date and time.
- Ensure that Track Number of Views option is ticked.
- Click on Submit.


Your submission point will now be in the content area that you created it in.
The availability will tell you when it will become available to students.
The Assessment can be marked using the Blackboard Marking tools or the Grade Centre. Guidance is available from the Blackboard Support Website.
When using the UWE Marking tool, you will need to tick the ‘show manually created assignments’ option.
Students who have been granted additional time
If there are students who have been granted additional time to submit the exam, the Module leader needs to create a separate assignment submission point and add adaptive release rules so that only the relevant students can see and access it.
- Repeat steps 1 to 16 above but set the specific Display From and Display Until dates and times for the student. The Due Date must be the same as the Display Until date and time. You should name the exam so that it is clear that this is the additional time version.
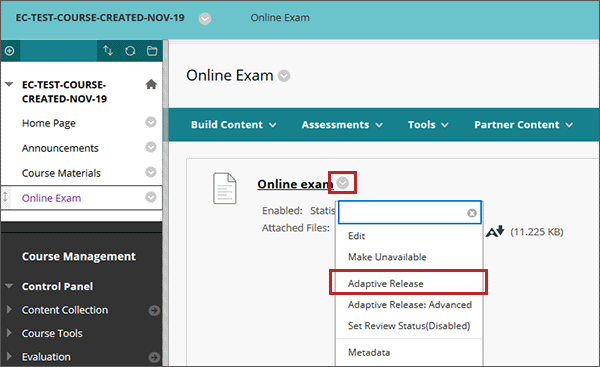
- Go into the Content area where you've placed the assignment; expand the drop down options to the right of the assignment name and select Adaptive Release.
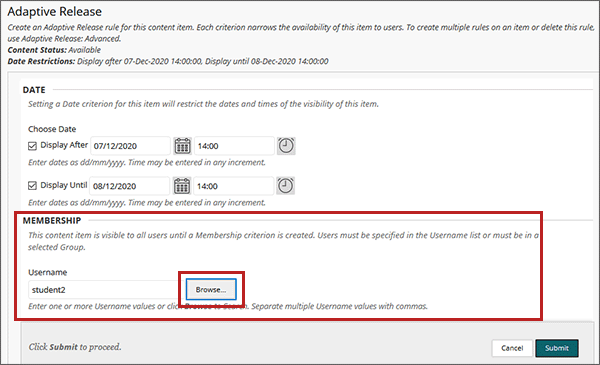
Please note: Caution should be taken if using the Adaptive Release Advanced option as this function can further restrict access. You only need to set membership which is detailed below. - De-select the tick boxes to the left of the Display after date/time and the Display Until date/time. Please do not set different dates as this will cause issues with student access.
- In the Membership section click on Browse and you will get a pop up window with a list of all the students on the module.
- Select the tick box to the left of any student who has been granted this additional time and then select Submit
- The usernames of those students selected will appear in the field to the left of the Browse button.
- Please do not change any settings in the Mark area. Selecting a grade centre column in this section means that the student will only see the assignment if they have an attempt/score for the grade column selected. Please leave with nothing selected.
- Please do not change any settings in the Review Status area. Adding an item in this section means that the student will only see the assignment if they have 'reviewed' the content you added. Please leave with nothing selected.
- Select Submit.
- Only the students that you have added in the adaptive release will be able to see and access this assignment. However, they will still be able to see and access the original exam assignment so it is important that you explain to them that they need to use the correct one (tell them how you have labelled it).
- As this is a separate assignment, the marking will be listed separately to the original exam assignment.
